Thursday, December 12, 2013

So many things to Share.....

These are even smaller.   TSo much to Share....Where do I begin?????

Stampin' Up! has so much on Sale right now, so the best place to start is RIGHT HERE  Just click on any section that you are interested in o the left column.   The first place to check is the Weekly Deals, these are some great $$deals that are just on sale til next Monday. 

Next - check out the Clearance Rack!!! Oh my, so many great things and some are discounted up to 80% off!!!

Then check out the Valentine Products -   Some cute products, just for Valentine's Day (ok you can use them for other than Valentine's too!)  

and don't forget to check out New Arrivals - there are Photopolymer stamp sets - new ones andthe Best of..... stamp sets and much more.

You can order directly on my website or if you are local and want to save on the shipping costs, contact me to place your order.  When ordering online - at least thru the 14th, use the Hostess Code 2TEXD9YN to get your name in the drawing for some Great Door Prizes!   I will be finalizing the order on the 14th, by 9pm EST.   Don't Delay, Contact Me Today.

Next.....I have a few - ok, more than a few Christmas cards I have been making.   Some are complete CASEing of others and some are a mixture of a few cards I have seen and others have just "popped into my head"  


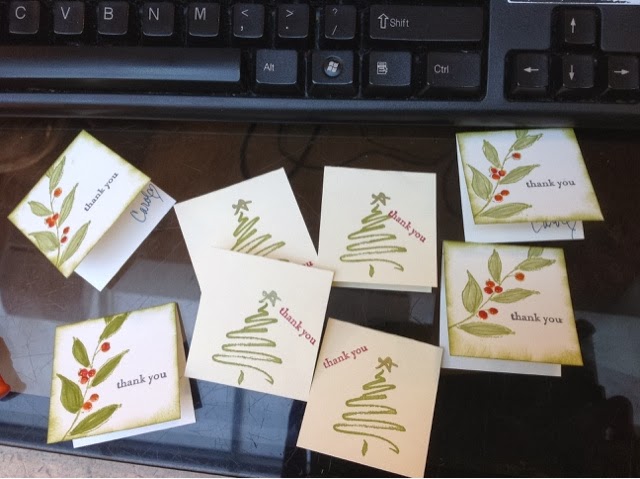
This first card is going to be my Christmas Thank you cards.   

These are the same, only 3 x 3 size, for putting a tip for server's at restaurants this season....

These are even smaller, 2 x 2,  I have even signed them, so I can hand them out quickly when someone does something nice or I love their holiday cheer and how they are blessing others around them..  

Enjoy!   Peace and Blessings....

Pass them on.

Tuesday, December 3, 2013

Weekly Deals and Giving Gifts

 
Today Stampin' Up! put up the weekly Deals for this week.   They are on my website, www.stampergirl.stampinup.net - just click on shop now in the upper right hand corner and when the screen opens, click on Weekly Deals on the left side, first item.   You will want to check them out there are some great Big Shot Dies on there and a few other items.   On December 10th, Stampin' Up! is adding a lot of Clearance Rack Items so don't forget to check them out next Tuesday.    They are listed just under the Weekly Deals on my website.

Giving Gifts....Since this is the season of Gift Giving, I have decided to give gifts out to all my customers who have spent at least $50 (lifetime since I have been a Stampin' Up! demo) to stop by my house and pick up a gift.   I have a huge 31 bag filled with gifts to choose from.   These will be available until December 20th.    To MY Top 10 Customers - I will have a special gift for you.   I will have an Evening later this month or just after New Years for these top 10 to get a special gift from me as well as Stampin' Night with New Product.

My Church, Crossroads Community Church, check it out here:   www.crossroads140.com is in this spirit of Gift Giving...we are giving gifts all week and on Sunday, we are signing our name (or emailing to the church how many gifts we have given and they are writing our names on the back of the stars).   We want to reach 10,000.  stars.   The whole Church is being decorated with stars.


Here are the Weekly Deals.....Want to order any of them?   Want them for a Christmas Gift.    I give Gift Certificates - any denomination.    Contact me to place your order for these no later than Dec 9th.  by 7pm.   I will place the order then.


ENJOY!

Thursday, November 21, 2013

Visit to Ronald McDonald House in Baltimore

Every month I visit the Ronald McDonald House in Baltimore.   I love visiting there and stamping with the guests.   Tonight a family that has been coming there for years came back and it was so good to see them and get hugs from everyone.  


Every month  I have the activity hour that follows the wonderful people from Poole & Kent Company, with Harry.   This month, one of his helpers did face painting, everyone loved them and they were great, so detailed!

Here is my daughter, Robyn  (blue shirt) stamping with everyone.   Thanks Robyn - I know you love going down there with me and you are a big help and I know these girls have fun when your stampn' with them.   

Fun Times.


ENJOY!

Tuesday, November 12, 2013

WEEKLY Deals are here again!!!!

During Stampin' Up!'s 25th Anniversary Month, they had Weekly Deals that could be viewed on the Customer Home page, every week different deals.   Well, they are carrying them over...for how long??? 

ANYHOW, Here are this weeks deals....you can also see them on the Stampin' Up's home page: www.stampinup.com   or on my website:   www.stampergirl.stampinup.net, also you can check out the Clearance rack - there is always some great deals there too.

HOW can you get them and get something extra????   Order them thru me either in person or go to my website: www.stampergirl.stampinup.net.  Shop now and start shopping on the weekly deals, choose which item(s) you want and make sure to enter Hostess code:  HEYVT679.   Your items will be shipped directly to you and I will get a notification.   When I get the notification, I will enter your name in for the drawing for the Hostess benefits.

You must order no later than Sunday, Nov 17th, 10pm Eastern standard time, that is when I will be finalizing the order.

Weekly Deals

We hope you enjoy this week's Weekly Deals! Head on over to the store to get some great product at a great price!


Gift Bow Bigz L Die Item # 129977
Regular Price: $32.95 US/$40.95 CAN
Discounted Price: $24.71 US/$30.71 CAN


1-1/4" Burlap Ribbon Item # 132140
Regular Price: $7.95 US/$9.95 CAN
Discounted Price: $5.96 US/$7.46 CAN


Extra Large Gift Box Item # 132147
Regular Price: $3.95 US/$4.95 CAN
Discounted Price: $2.96 US/$3.71 CAN


Mini Muslin Bags Item #132180
Regular Price: $9.95 US/$14.95 CAN
Discounted Price: $7.46 US/$11.21 CAN


Orchard Harvest Swatchbook Item #128137
Regular Price: $12.95 US/$13.95 CAN
Discounted Price: $7.77 US/$8.37 CAN


Real Red Simply Created Goodie Gear Simply Created Item # 132161
Regular Price: $4.95 US/$6.95 CAN
Discounted Price: $3.71 US/$5.21 CAN


Witches' Brew Designer Series Paper
Item # 132185

Regular Price: $10.95 US/$13.50 CAN
Discounted Price: $7.11 US/$8.77 CAN

Wednesday, October 30, 2013

Stampin' here in Connecticut

WOW, where did the month go?   I can't believe it is almost Halloween! 

I am in Connecticut on a mini vacation and believe it or not, have set up a stampin' station in our hotel room and have been doing some stamping.   I am stampin' while here in CT and getting some Christmas Cards done for Ronald McDonald House.   I am a part of a Wonderful Group of ladies who meet every Wednesday and stamp, scrapbook, crochet or even search the net on Pinterest!   We have been making some gorgeous cards for Christmas for the guests at Ronald McDonald House.   My goal is 360 cards, which would give every family staying at the house, 10 cards each.   I'll wrap them all in ribbon and give each family a packet of cards.   I share some of those cards later when we get together to package them up.   Currently I have 290 cards and need 70 more cards which should take no time in getting those completed.   I have 10 cards that I am working on here in the hotel tonight.   Hopefully I can get those done, or mostly done....just realized I need a few markers I didn't bring on finish coloring in some images.

I was going to share pictures of our October Club Cards, however.......they are not on the camera card I have with me!!!   what I didn't take pictures!!!???   SO, instead I am sharing some other cards I have made this month.

This first card, yep it is sideways.....can't figure this out, have spent hours!!!! so I decided I better just go ahead and at least share it.   In my pictures on my camera, the camera card, the picture folder in my computer, all have this card and the other one right side up...however whenever I try and bring it over here to my blog, it shows sideways.... how frustrating and I am sure it is not easy to view, but I would rather at least share it than not.

I used a mixture of Stampin' Up! products and other companies items that I have had in my possession for years.   I used all Stampin' Up! cardstock, the embossing folder is the chevron.   I used the bird from ? not sure what company, will have to look when I get home and update this post.  I also used a Happy Birthday Stamp from an unknown company, at least for now.   Update to follow in a day or two.  First I stamped the bird in black staz on, then colored it in using an aqua painter ink pads.   I stamped another image of the bird and cut out using my paper snips.....(they are on sale starting today).   After cutting the image out (which was super simple and quick) I used temporary adhesive to cover the stamped image on the cardstock and then sponged Sahara Sand, So Saffron and coastal cabana on whisper white cardstock.  I added dimensionals to pop the layer of the stamped bird up.  This card is for my Mom's husband, Ed, it was his 91st birthday on the 28th!!!! 


This card was inspired by a card I saw on Splitcoast stampers.   Julie  used a computer laptop image.  I used the typewriter from You're my Type, a retired stamp set from a few years ago.   I have spent so many years of my life typing.   First in a typing pool for SSA, then as a typist and then a word processor, also at SSA.  When I went to the hospital to work, we typed the patient's charts on a red IBM typewriter, then computers came along, and my typing speed and accuracy went down the drain!  This card was super quick and is for my nephew, Pete who is a computer gruru...


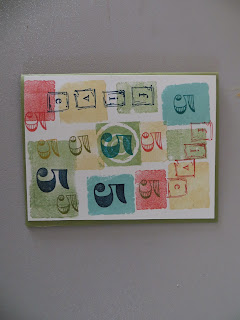
This last card was inspired from a Stamping magazine I was looking thru that was from 1999!!!!  I used some "shadow" stamps that was all the rage years ago, yep I still have mine.   I inked them in subtles colors varying the sizes of the shadow stamps.   I then searched my number stamp sets, and realized I had 2!!!!, so I found the alphabet stamp set among my non Stampin' Up! stamps and spelled out the number 5.  I stamped the numbers and letters in darker colors than the shadows.

I hope you get a chance to stamp today.


ENJOY!

And check out the latest sales special on the Stampin' Up! home page, www.stampinup.com. They are only on sale for a week.   They are great deals.  I am lovin' their 25th Anniversary.


Wednesday, October 16, 2013

New Photopolymer stamp set, just in time for Christmas

Stampin' Up! is adding so many new products and sales, I am having trouble keeping up.  The latest, today.   a new photopolymer stamp set and I LOVE IT, I am ordering mine tomorrow, along with a few things that are on sale!!!

OH MY, I can't wait to get this set on my hands and it is one, I am keeping forever!!!  I love the fonts, the printing and writing.....and only $13.95.   ordering tomorrow, actually by the time this gets posted it will be tomorrow, so Wednesday evening I am ordering this!


and here are the Great Deals this week, starting today, but only while supplies last.   For a change, one of the items on my Wish List is one of these Deals!!!  WOOHOO, so in addition to this new Christmas photopolymer set, I am getting the Deco label framelits.  

See these great Deals:to


You can order any of these deals thru my website:  just click HERE  Or you can contact me up til midnight daylight savings time 10/16/13 to add your items to the order I am placing. Just call me, 410.382.4874!!!   Anyway you place your order, use Hostess Code:  P6DRJ7JJ, everyone placing an order thru this Hostess Code will be in a drawing for a $25 Shopping Spree thru ME. 

OK, SO what am I sharing today......????    These great deals,nd later, after my nap - that is about how much I get, I know, I really need to sleep more.   I keep trying......

SO later today when I have Rachel Duty, I will share a picture of her (of course) and some stamping projects too!


ENJOY!

Thursday, October 3, 2013

Gorgeous Grunge and Washi Tape One Day Sale - TODAY!


Where did September go???  Oh my it went fast.  at the end o the month is my grandson's birthday and my daughter's birthday.    What kind of card to make a 10 year old?   I got out my Gorgeous Grunge stamp set and grabbed some card stock and ink and started to stamp.


I have a Big Swirly Happy Birthday from years ago (no Stampin' Up!), but that I love to use for kids, on envelopes, so I pulled that out along with my Memorable Moments stamp set and made his birthday, took about 3-5 minutes and that is from beginning to end, even the design.   I wrote a little note to him on the inside about the day he was born and put $10 in there since he is now 10.  

Go to the party and Colin starts opening his presents and he gets to my card, and before he opens the envelope, he says "you made this, didn't you?"  I said yes I did.   He opened it and one of the kids behind him said, "no way!  You MADE THIS??  SO COOL!!!"   whew!.  Colin said to me, Grammy I know why you gave me $10 cause I am 10, I said "Yep, that's why" and all the kids started getting excited and said WOW just think, $20 when your 20!!! Oh my, that would be easy, wouldn't it! 
Sad, though he told me he couldn't read my note because it was written in cursive and they don't teach it in schools anymore, so my daughter read it to me....that just makes me a little sad.
I guess that is how generations before have felt about how they used to write......onto the card.


Sorry the picture is dark, took the picture, put the money in the card and didn't look at the picture till after the party.


I even used a little Washi Tape. 


Speaking of washi tape, it's on sale, today only:


 This is from the Stampin' Up! Customer Home Page:


Quick Halloween Tags and a Thank You

Washi tape is such a fun, easy way to add a little bit of pattern to a project. The Witches’ Brew Designer Washi Tape was the perfect addition to this quick treat tag. I love how the skulls show through the die-cut H window (made using the Big Shot and the Typeset Alphabet Bigz Die). The chevron pattern tape adds a little pop of color in seconds.


 Epic Day This And That Designer Washi Tape

Regular Price $4.95 US/$6.50 CAN
Sale Price $3.71 US/$4.87 CAN


Gingham Garden Designer Washi Tape

Regular Price $4.95 US/$6.50 CAN
Sale Price $3.71 US/$4.87 CAN


Witches' Brew Designer Washi Tape

Regular Price $4.95 US/$6.50 CAN
Sale Price $3.71 US/$4.87 CAN


Remember this is on sale just today, You can order HERE from my website or contact me no later than 11pm EDST tonight via 410.382.4874 txt or call, or email me at sbjcarol@yahoo.com.


ENJOY!

Monday, September 23, 2013

Stampers Club Cards and envelope

This month for Stampers Club, I changed the extra project from a 3x3 card to an envelope made with the new Envelope punch board....   My first 2 or 3 envelopes weren't that great, I either creased too hard and cut the paper or I had the first measurement wrong for my size paper.   It is really a great new tool, not for just envelopes but cards too and the corner rounder it has on it is very handy.

Here are my first 2 usable envelopes, which I have already used.   They both are made using some retired DSP, but you could use anything, even wrapping paper!   I do like the double sided paper, so when the recipient opens the envelope, the inside is beautiful too.  My niece sent me a card with some photos in it a couple weeks ago and the envelope was double sided paper.   For several days I kept opening the envelope and checking out the paper on the inside.   It was so pretty!  I try to always stamp something on my envelope so I am not sending a naked envelope, this just gives me another option.   How to seal?  How to address it?  I used snail adhesive on the flaps that are at the bottom, after I put the card in the envy, I used some snail too for the top flap, you could really use any adhesive.   As for the address on the other side of the envy, I used some labels that were being discontinued from my work 10 years ago, there were almost 5000 in the box back then and I haven't used that many over the years, maybe 100-200.   I am giving anyone ordering the envelope punch board from me a couple hundred of those labels as a Thank You.


Supplies Used:    Envelope punch board   #133774    $19.95
Retired DSP papers
 
 
 Here is the 1st card we made, simple and uses washi tape, I have all that we sell, however I have never used it.   I copied the card from somewhere but I didn't write it down, sorry, so if you see this on my blog, and  it's a copy of yours, let me know and I will edit this post and give you credit.

The card uses the two butterfly punches, some of the washi tape from the Gingham Garden Washi Tape pkg.  Oh my, that stuff is great for adding some color - quickly to a card or project.
The birthday is from the Remembering Your Birthday set from the catalog.  I guess I should have used the stamp set, Papillion Potpourri since there is a sale...purchase Papillion Potpourri stamp set and the Bitty Butterfly Punch together and save 15%   clear mount #135311   $26.27 a savings of $4.63 and wood mount #135312  #29.67 a savings of $5.23   A great deal if you don't own either of those items.   But just for another week, ends Sept 30th.


Supplies used:   Daffodil Delght Card stock   #119683 
Whisper White Card stock   #100730 
Daffodil Delight Ink     #126944
Elegant Butterfly Punch   #127526
Bitty Butterfly Punch    #129406
Gingham Garden Designer Washi Tape     #129314
Candy Dots, Subtles   #130933
Remembering Your Birthday stamp set #131350
Occasions Paper Piercing Pack   #129387
Dimensionals    #104430
 
This next card uses the circle card Thinlit die, new and not in any catalog yet, however you can order it.  I have a lot of retired DSP, so for this card I decided to use up some of it.  I also had just enough Lucky Limeade card stock (also retired) for the base of the card.  When making this card, I wanted to layer it with DSP, but you need the circle framelit dies to cut the circle out and I don't have those yet, so I searched the Internet and found a video on making a layer without the circle framelits.   It showed making the card horizontal instead of vertical, so that is what I did.  It is not too hard to do, you just have to lay your card stock under, then over the thinlit die.


 Here is the inside after you "swing" it open.   Not much space to write a message, however you can do that on the back of the card.


Supplies Used:   Lucky Limeade Card Stock
DSP retired (not sure what package)
Island Indigo Card Stock   #122923
Whisper White Card Stock    #100730
Island Indigo Ink   #126986
Basic Gray Ink   #126981
Smoky Slate marker   #131898
Pool Party marker    #126982
Summer Starfruit marker    #126856  (2012-2014 In Colors)
Circle Card Thinlit Die  #133480
Scallop circle Punch    #118874
Dimenionals   #104430
Crystal Effects    #101055
 
 
A couple of card classes are coming up soon, I will post here as well as "my newsletter" email that I send out.   If you would like to receive "my newsletter" comment below or send me a email at sbjcarol@yahoo.com.  If you want to purchase any of the items mentioned in this or any other blog posts, shop at my website, email me, call me or txt me @ 410.382.4874.


Enjoy!
 
 
Carol


Friday, September 20, 2013

Envelope Punch Board

OK, So I tried to get this on my blog about 10 days ago and after a frustrating hr or 2, gave up and went to bed.    I had talked to my friend, Frances Wagner about how to do it and she gave me steps to try, but I was on overload and couldn't see for looking!!!   DO you guys ever have times like that?  especially with technology?? or looking for your keys?   eyeglasses?

Come on! I know I am not alone...

Anyway, The Envelope Punch Board is here and if you are part of my Stamper's Club, we used i to make an envelope out of some retired DSP....Got any of that????  I even have packs of DSP before it was double sided prints.....I think I might use them for lining regular envelopes.


This punch board is so easy to use....and it has it's own scoring tool, 2 punches (one for the notch on the paper so that the envelope folds with ease and a corner rounder punch too.   There is a list for dimensions for your size paper you need for the size envelope you want to make depending on the size card you have.   Check out this video from Stampin' Up!


Still can't get the link embedded into the picture.....one day I will get it ..... or not.....
 
 
ENJOY!  


Thursday, September 19, 2013

New Photopolymer Stamps

I'm learning something new...


There are so many new products from Stampin' Up! and I just can't keep up with them....I love that Stampin' Up! is always coming out with new products, bringing back some old ones too (The Best of Stamp sets) and so much more....Coordinating colors of everything!!!

I am learning how to upload the flyers that come out with these new products and announcements too.

Here are the first two that I am sending out:   I will try not to bombard you with too much all at once.

These two new sets are super cute and I think I just might have to try them out!      The first set is Map It Out and contains 64 stamps in all!!!  Item # 134620 


This next set is Greetings from and has 19 stamps in the set, Item # 134621....lots of cute stamps to use on cards, scrapbook pages, invitations and more.


Each set is only $13.95 and you can order either of them directly from my website, click on SHOP in the upper right corner, then choose stamps on the menu and choose photopolymer stamps and ALL of the Photopolyer stamp sets that are available with show up for you to check them all out!   or contact me via email, sbjcarol@yahoo.com to place your order  (Baltimore, Westminster, Eldersburg, Owings Mills, MD) for free delivery from me or pick up at my home or to meet somewhere in between.  And of course, you can always call or txt me   410.382.4874.
 
Can you believe it?   Spell Check on Blogger is not working at this time, try again later.......SO I proofread this post and fixed all the errors (I hope I got them all).....I remember working at SSA in 1972 or 73 and helping out sometimes with proofreading letters we typed (on typewriters) in the Typing Pool!!!!
 
 
Thanks to Frances Wagner for helping me thru the steps to put these pictures on my blog!!!


ENJOY TODAY!

Monday, September 16, 2013

Stampin' Fun and Giggle Greetings Birthday Cards

A busy week  last week, a mini vacation to Atlantic City.   No BIG winnings, but it was a nice relaxing trip.   I walked along the beach and waded in the ocean, the water was SO NICE.  No stamping and No Internet.   I came home to help two of my daughters with packing for moving.   Lots of boxes, trips to storage units and even a trip to the Dr's for granddaughter, Rachel.... - she is better now.

This weekend, my daughter Aimee came up to scrapbook all weekend.   We did get a little flea markets and shopping in along with scrapbooking and stamping.   Her youngest, Jacob kept face timing her yesterday...."when are you coming home"   "can I come up there with you"  "why can't I come there with you"   etc.etc.     Wish I had taken pictures of her visit here and of some of these face time pictures.....Would have made some great scrapbook page layouts, for sure.

Stamp Club was held today and I will post the pictures of the projects next week after the rest of the members of Stamp Club come and make their projects.      After dinner tonight, I sat down to finish a few birthday cards.    I never looked twice at this set in the catalog  when first looking thru it, however I received several swaps using it and  "just had to have the set".   Now I have used it, making 2 cards for some special people.   Not sure thy will see this post before they receive the cards, but will post them anyway.


This is such a cute set to watercolor or use your retired!!! pastels or any coloring medium.  I used our Marvelous Markers and a blender pen. 

Items used:

Retired Ribbon - Pacific Point....This was a large scrap of ribbon and I was able to make the two cards with the scrap with about an inch left over!


Giggle Greetings   Wood - #131062,  Clear Mount  #131065
"D" Clear Acrylic Block      #118485
Pacific Point Card Stock        #111350
Pumpkin Pie Card Stock        #105117
Whisper White Card Stock    #100730
Argyle Embossing Folder      #127750
Window Frames Framelits    #129021
Black StazOn ink    #101406
Marvelous Markers  #131264 (38 colors)
Blender pens    #102845
Bone Folder      #102300
Snail -  #1044332 and refill only   #104331  yep that is what I use....occasionally the Multipurpose liquid glue   #110755


Monday, September 9, 2013

More CASing....Betsy's Blossom

Casing again....This time I CASEd a card I saw on a blog, Stampgoodness Simply Saturday post.   It is a Simply card, one you can mass produce if you wanted to make a bunch.   I have been mass producing some of the swaps I have CASEd to send out, usually  10 cards in all.   Today I made my standard, 2 cards.   I figure if I am cutting the cardstock in two to make a card, I might as well make 2 cards.  


I used Betsy's Blossoms stamp set, because I do not have Regarding Dahlias stamp set!!! Shocking I know, but I don't own every stamp set in the catalog, however I think I own at least a third of them.   One day when I am searching the catalog, I will have to count them.

I used Crisp Cantaloupe as my card base and the ink color for the flowers.   For the ribbon and ink color for greeting and the layer behind the greeting, I used Calypso Coral.   I used Crystal Effects on the Happy Birthday as well as colored in all the letters of Birthday.  I put 3 tiny drops of Crystal Effects after the word HELLO too.  The ribbons I used, on the left is a ribbon from Sale a Bration (I just loved that ribbon, 3 spools of ribbon in Calypso coral, island indigo and pool party)  and the ribbon on the right is from the catalog, page 173 the 3/4' Chevron ribbon also in Calypso Coral.   I just love this Chevron ribbons in all the Colors.   I still have ribbon shares available for these ribbons, 2 yards of each of the 12 colors, $28 plus shipping if you are not local.    Don't you just love how Stampin' Up! coordinates all their products, matching the colors of cardstock, ink, markers, ribbon, embellishments and more!

Products used:

Crisp cantaloupe cardstock and ink
Calypso Coral cardstock and ink
Calypso Coral 3/4" Chevron ribbon
Calypso Coral 1/4" ribbon from the Sycamore Street bundle from SAB (retired)
Crystal Effects
and Stampin' Up's wonderful Dimensionals


Hope my inspiration share inspires you. 

ENJOY!


Carol Valentine
sbjcarol@yahoo.com
410.382.4874


Saturday, September 7, 2013

Fab Friday Challenge, TRULY Grateful...CASE of a Convention Swap...again

This summer I attended Stampin' Up!'s 25th Anniversary Convention, it was a blast and this year I made 150 card swaps and 80, 3x3 card swaps.    Year after year, I make swaps, and swap at convention and come home, put a few on my display board and the rest are tucked carefully in a box (or two), never to be seen again, until I reuse them for Ronald McDonald House cards to donate.   WELL, this year I have made a goal, actually a few goals.   First, I am determined to use most of the swaps either as a CASE or at least inspiration for a stamp set.   SO most of the cards are sitting in 2 boxes with the lids off so I can look thru them for inspiration!   I have used 8 cards to CASE and 4 3x3 cards to CASE.   My 2nd goal was to send 20 cards to people each month, not for their birthday, but for no reason, or just cause I was thinking about them....After all, I do sell products to make cards!!!!!!!DUH, July,, I sent 26, August 22, and September - so far 7.   Third, to reach my $100,000.00 Lifetime Sales by December 31st.    Only $1621. to go, I know I will make it.
I am SO Grateful for so many things, my husband, my children, grandchildren, my health, my family, my friends, and the list goes on!   I am Thankful, yes, truly grateful for so much, my customers, who are now my friends you have helped me get this far.   I love what I do and I try to share as much as I can.

Tonight while stamping and looking on blogs, fb and more, I read an email from a blog I subscribe to, Fab Friday....their challenge are fall colors, chocolate chip, crushed curry, soft sky, Sahara sand and tangerine tango.   I just made a card, CASing a Convention Swap for my upline's meeting using those cards (minus the Soft Sky).    I decided to enter this for the Fab Friday Challenge, not that I can win a prize (I have no idea whether there is a prize), but to share.   So here is the Convention Swap from Tina (do not know the last name) and then my CASE for this Fab Friday 26 Color Challenge

 Tina's card used Daffodil Delight, white and black, so simple, but beautiful!  


Here is my CASE, I used chocolate chip for the card base and the layer behind the stamped image.   I used crushed curry embossed with the woodgrain embossing folder and sponged a little of the chocolate chip on top.   I cut a strip of Sweater weather DSP 2 x 4 and placed on top of the woodgrain embossed layer.   I stamped the background from Truly Grateful Stamp Set in the Holiday catalog using Sahara Sand ink on Very Vanilla cardstock, and stamped the wheat and Truly Grateful in chocolate chip ink.   I colored the wheat using crushed curry and chocolate chip markers and aqua painter and the tangerine tango marker.   I didn't have any Candy Dots in any of these colors, so I colored in some pearls using a brown sharpie marker.  They actually look like Cajun craze, but it was just a brown sharpie.   I popped the stamped image using the WONDERFUL Stampin' Up! Dimensionals.

Supplies used:

Chocolate Chip cardstock and ink
Crushed Curry cardstock and ink
Very Vanilla cardstock
Tangerine Tango marker
Sahara Sand ink
Aqua painter
Woodgrain Embossing Folder
Sweater Weather DSP
Pearls
Dimensionals
Snail adhesive
Truly Grateful stamp set
and a brown Sharpie marker

Want to CASE my CASE and need some of the supplies listed above, you can order anytime from My Online Store. Just click the Shop button in top right corner.     Place an order and receive a FREE Stampin' Up gift from Me, if your order totals $150 before shipping and handling, contact me before finalizing your order so that I can be sure you get the Hostess benefits you earn.   Have questions???? Don't hesitate to contact me via email sbjcarol@yahoo.com, or call or txt me 410.382.4874.


ENJOY!


Carol Valentine

Friday, September 6, 2013

Keurig Pod Gift Holder, directions and organization for projects.

I am going to share the directions on how to make the Keurig Pod Gift Holder that I posted yesterday.   I am also sharing my new method of organizing projects (3d).  

First, I am not sure whose blog I originally saw this pod gift holder, however they received it at Convention from a fellow demonstrator, Kelly Mayou.   So here are a few pictures how I made it and my new organization for those projects:

To start your project, you need a piece of cardstock 6x6, some coordinating DSP (easy because of Stampin' Up! coordinating everything), 1 3/4 circle punch, adhesive, sticky strip, bone folder, paper snips, simply scored tool is great, or our paper trimmer with scoring blade.

Step 1:   Take your 6x6 cardstock and score at 2" and 4" vertical and horizontal, burnish with your bone folder.

 
 Step 2:  Trim with paper snips on either side of center block - can you tell by the picture?  Then trim on each side of the back to score lines - this is at the top of this picture.
 Step 3:  Fold this panel where it is trimmed on either side of center square, fold it up and put thru the 1 3/4" circle punch making sure you are in the center (almost, at least) and punch thru both pieces of cardstock.


 Step 4:  use sticky strip to adhere both circles together first, then apply sticky strip on the 3 under sides.   Wrap around the sides with no sticky strip first, then the other side with the sticky strip on it. 


Step 5:  put sticky strip to undersides of other panels, and press up to side.   You are working with the box upside down and it does not have a bottom, but the K cup sits perfectly on the finished box.


Step 6:   Decorate as desired, you will need some 1 3/4" squares of DSP for the outside of the box, something to decorate the front of the box (one of the sides).   I used the Perfect Blend stamp set and then some DSP along with some punches or BS dies to decorate the top of the K cup.


Now for the organization tip:   

I write the directions first on a piece of scrap paper, then write them neater on a 3x5 index card and punch a hole on the left top side to put on a binder ring and on the right side, I put a number in a circle ( which is what project this is).  This is project  #6
  I keep the template (white cardstock) and a sample (baja breeze cardstock) in a baggie marked with the number on a bright green sticker at the top.  I make a template in non SU white cardstock and also a finished project in cardstock, so that I can see what it will look like.   I don't put it together, so it will lie flat in the baggie.
 Here is the white template, scored, cute and punched, along with written instructions as to punching, where to put sticky strip and dsp.
 Here is the underside where sticky strip is needed.  
 and here is the finished project, except I did not adhere it together so that it will lie flat in the baggie.

Thursday, September 5, 2013

Stampin' fun. A Keurig pod gift holder

I have been doing lots of stampin' lately... And organizing too.   I saw this project on a blog and knew I had to make one...  Normally I would make it and write directions on a price of paper and save them in a folder...never to be  seen again or when seen, have no idea what it is, or really understand what I wrote.   Well no more, I came up with a new organization method.  I'll share that with pictures and directions on how to make this cute Keurig pod holder, gift container next post.  


Wednesday, September 4, 2013

By t he Tide Swap and My CASE

My upline, Carol Taggart made this swap.   I had use this set as well as the By the Seashore set for my 3x3 swap for convention.   I needed some cards that did not have flowers and could be used for a man or woman or even younger.  


I left off the green layers - both on te strip an behind the image layer.  I decided to use crystal effects on the anchor circle and move it below the stamped image.   I also colored the fish with the retired pastels.   I really miss those and still use them for adding quick color to an image.


ENJOY!
Carol Valentine
410.382.4874

Monday, September 2, 2013

Westlands Club Card and Summer Silhouettes Club Card

The next card I CASEd used the Wetlands - one of my top favorites from the new catalog.    This swap card was crate by Deb Verbosh and I didn't change much from hers.   I loved how it turned out!

Even though I used the same colors, I think my Soft Sky ink is older and looks more green than blue....  


My card uses Happy Birthday for the greeting and I changed the bakers twine to linen thread and I didn't want a bow since this card is intended for a man.  I also stamped the reeds twice and did not stamp in onto the cad base.   Other than those changes, it is the same.


The 3x3 card I CASEd this month uses Summer Silhouettes a favorite and well used stamp set.  It was created by Helen Burnley and from the 3x3 swap at Convention.  My Mom was visiting from Florida for one of the dates of Stamp Club and since she doesn't get to stamp with me that often, I let her choose from those 3x3 swaps on the on sh wanted me to make...and this was the one, out of 80...


I decided to save the thickness of the card and omitted the Rich Razzleberry layer, and instead sponged that color around the stamped image layer.   Cute huh?!


ENJOY!

Carol Valentine

FREE SHIPPING !!! Plus DSP Sale still going on

 Hey, I know it’s been like a hot minute since last posting on my Blog, but here goes!   I have a few wonderful products in this new catalog...