Monday, December 31, 2012

Yes, more Cards to Share

Another group of Christmas Cards to Share:

This first one is from Maria, she used a wreath stamp and colored the images in with some watercolors
 Sue went all out with her card, she sewed the zigzag stitching all around the greeting image which is embossed and colored in with some markers.   background is some printed paper.
 Irene used some preprinted layers and some brads and ribbon (I think I have some of that same ribbon, purchased at Impressions from the Heart)  Miss that store that was in Casselberry, FL where my Mom met Irene.
 Bobbi's card has some skaters stamped in a large ornament and waterolored the images.   The embossing on the layers is a snowflake pattern and swirls pattern.  Pretty purple sparkly ribbon.
 This I Kathy's card using the Holly stamp and some red dazzling details.   the embossing folder is the Lacey brocade from the Holiday catalog. 


This card was not signed!!!   They used the Oval embossing folder from the Holiday catalog and the tree stamp cut out with the framelit that matches the stamp set.  If this card is from you, let me know.    

Sunday, December 30, 2012

More Christmas Cards to Share

I have several more cards to show you:  

Well this first picture is a picture of my granddaughter, Rachel at her 1st Birthday Party, the theme, Mickey Mouse.   Here she is with her Aunt Robyn aka Aunt RaRa.   My camera acted horrible that day! so I am waiting for some pictures from my other daughters who took a bunch of pictures.

 This card is from Karen, she used a preprinted card and stamped the Let it SNOW (retired set) and colored it in with markers.
 Next is Joan's card, using the Fantastic Big Shot Adhesive Sheets, and dazzling diamonds to have you looking out at wintery sparkling trees.  
 Here's Debbie's card, she used a retired snowman from a set I think was called Let it Snow.  It was a favorite of mine and one set I wished I had held onto....Oh well.
 Dolly's card, I think uses all cricut images, and a swirly embossing folder. I have never been able to master the cricut, of course I don't own one, so I don't get much practice using one and when I do go to use someone's, my work ends up in File #13  (aka trashcan)
Til next time.....Get a early start on next years cards, start now.

Saturday, December 29, 2012

My Favorite Things from the Spring Catalog and Christmas Card Sharing

A few years ago, I would offer specials to my customers, and I decided I would do this again and maybe change it up a bit.   SO, starting January and the new Spring Catalog, each month I will post some items that are my favorites!   When you purchase any of these items, I will take 10% off of each Favorite Item you purchase.   Purchase all my favorites for the month and I will give you a FREE spool of retired ribbon, and if the ribbon is less than half full, I'll give you two.  

Here are my Favorite Five Items for January

Bitty Butterfly punch  #129406, pg 13   - this punch fits perfectly on the Bloomin' Marvelous stamp set in the Saleabration flyer

Pool Party, anything...card stock, ink, ribbon, whatever has the color pool party in it, designer series paper that has pool party as one of the colors counts too!

Swallowtail HUGE butterfly stamp #129216, or 3129213 wood mount, pg 18 - This stamp is Huge and when you use it, you don't need another thing on your card, it does it all.

Silicone Craft Sheet  #127853, pg 36 - This fantastic item is carried over from the Holiday catalog, but it is one item a crafter should have.  

Tea for Two DSP #129311, pg 3 - I love this paper.. So Spring!


Christmas Card Shares

Over the next few days I will be posting some pictures of the handmade cards I received from my stampin' friends and family.

Here are the first few cards:

This cute bird card is from Adela, she used the set For the Birds and the holiday oval embossing folder
 This next card is from Linda, she used the ornament stamp and framelit to cut out the ornament, she also used the fancy fan embossing folder and some ribbon (unknown source) that has winter images embossed on the ribbon and the colors match perfectly.
 This next card is from Phyllis, she used the dots embossing folder, a scallop circle from a Big Shot die, some silver glimmer paper and cherry cobbler seam binding.  So elegant!
I loved all these cards as well as all of the cards I received.  


I'll share some more cards next time.

ENJOY!


Sharing....

A lot of blogs I check out offer Product Shares.   Well I offer them too, I just do them a little different.  I only offer full sheets of DSP and card stock and share the ribbons in bigger quantities than most people do.   Check it out and if you have any questions, don't hesitate to contact me.


Here is how I do my Sharing:

DSP - you will get 1 full sheet of each design from the package and pay half the price.

Card stock -  either 1/2 a package or 1/3 of a package

Ribbon -  half of a spool or 1/3 of a spool

Buttons, brads and trinkets - evenly shared depending on how many are in the package.


I hope my Sharing will help you get the most use out of those products and you are not stuck will a lot of product(s) that you will never use.

Christmas Pictures

New Camera from my husband, so I decided to share some pictures of our family. 


Youngest daughter, Robyn

 Oldest Daughter, Aimme,   grandson's Colin and Jacob, and their Uncle Mike and Dad, Steve
Granddaughter Rachel with her parents, my Middle Daughter, Christine and husbandMike.  

Here's my husband, aka Grandpa, playing peek a boo with Rachel and Mickey


I love my new camera, but still have lots to learn about it.  More Christmas cards to share with you coming soon.


Friday, December 28, 2012

Stampin' Up! Catalogs, Saleabration and More


I hope your Christmas was filled with Joy and Love. Did you get all your Christmas cards made? mailed out? Handmade Christmas gifts made and given out? If not, don't fret, you can still mail out cards and change the greeting inside to include a New Year greeting. One gal suggested a new tradition....Having her Christmas Cards postmarked on Dec 24th!!!  That is great for those of us who procrastinate!
The Holiday catalog ends in 5 days! If you didn't get everything you wanted from that catalog, now is the time to do it. There are a bunch of products and stamp sets that are being carried over in the Spring catalog, so check page 36 of the Spring catalog to see the items that are being carried over. Contact me by 4pm on Jan 2nd to add your order to other orders I receive from the Holiday catalog. OR you can go to my website: http://www.stampergirl.stampinup.net/ and order anytime before midnight Jan 2nd.
The Spring Catalog begins on January 3rd and items will be available until May 31st. AND just in case you didn't get everything you wanted from the Holiday catalog, 9 stamp sets and a bunch of great products are being carried over at least until May 31st. Check them out on page 36 of the Spring Catalog. Did you get a copy? If not, let me know and I will get one to you.
    
Sale a bration begins on Jan 22nd .....read more below.
What is Sale a bration (SAB) you ask??? It is when Stampin' Up! gives FREE products to everyone! All customers purchasing $50 (before shipping and tax) get to choose 1 item from the SAB flyer. All Hostesses who have a party, catalog party or gather orders from stampin' friends  that total $150 (before ship/tax) get a free package of Silver Glimmer paper....It's Stampin' Up!'s 25th Anniversary!!! and the free $25 in Hostess dollars to use on any merchandise in either the 2012-13 Catalog or the Spring Catalog. When your party total reaches $400!!! the hostess will receive the free package of Silver Glimmer Paper, free Product bundle (includes the Madison Avenue stamp set, Sycamore Street Designer series paper and the Sycamore Street ribbon & button pack) free $65 hostess dollars to use on any merchandise in either the 2012-13 Catalog or the Spring Catalog AND one item at 50% off from either the 2012-13 Catalog or the Spring Catalog. 
Did you receive a SAB flyer? If not, contact me and I will get one to you.

Friday, December 14, 2012

Clearance Rack Blitz!!! and Christmas Card Sharing

WOW!!! Stampin' Up! put a BUNCH of GOODIES on the Clearance Rack today.    They won't last that is for sure, Go here to check them out!!!

Here is the first of many Christmas Cards I will be sharing with you.   My camera battery needs charging so only one card today...


This card was made by my friend, Patricia Caless.   The colors are Cherry Cobbler and Whisper White.   The stamp set is retired, Gifts of Christmas.   I love it....Stamping!!!!


Thursday, November 22, 2012

Happy Thanksgiving and the Stampers Club Cards

Wishing everyone a Day filled with Blessings on this Thanksgiving Day.  I have been blessed with a Great Husband, 3 Beautiful Daughters, 2 Handsome Grandsons and 1 Cute Granddaughter,  and 2 Son in laws.   I Love them all!!!   I have 2 brothers, a sister, my Mom is doing well and works circles around everyone!   I Love You All.....This list could get rather lengthy, so I will make is short.   I have so many relatives and friends  that I am SO thankful for......I am so Thankful for Everyone


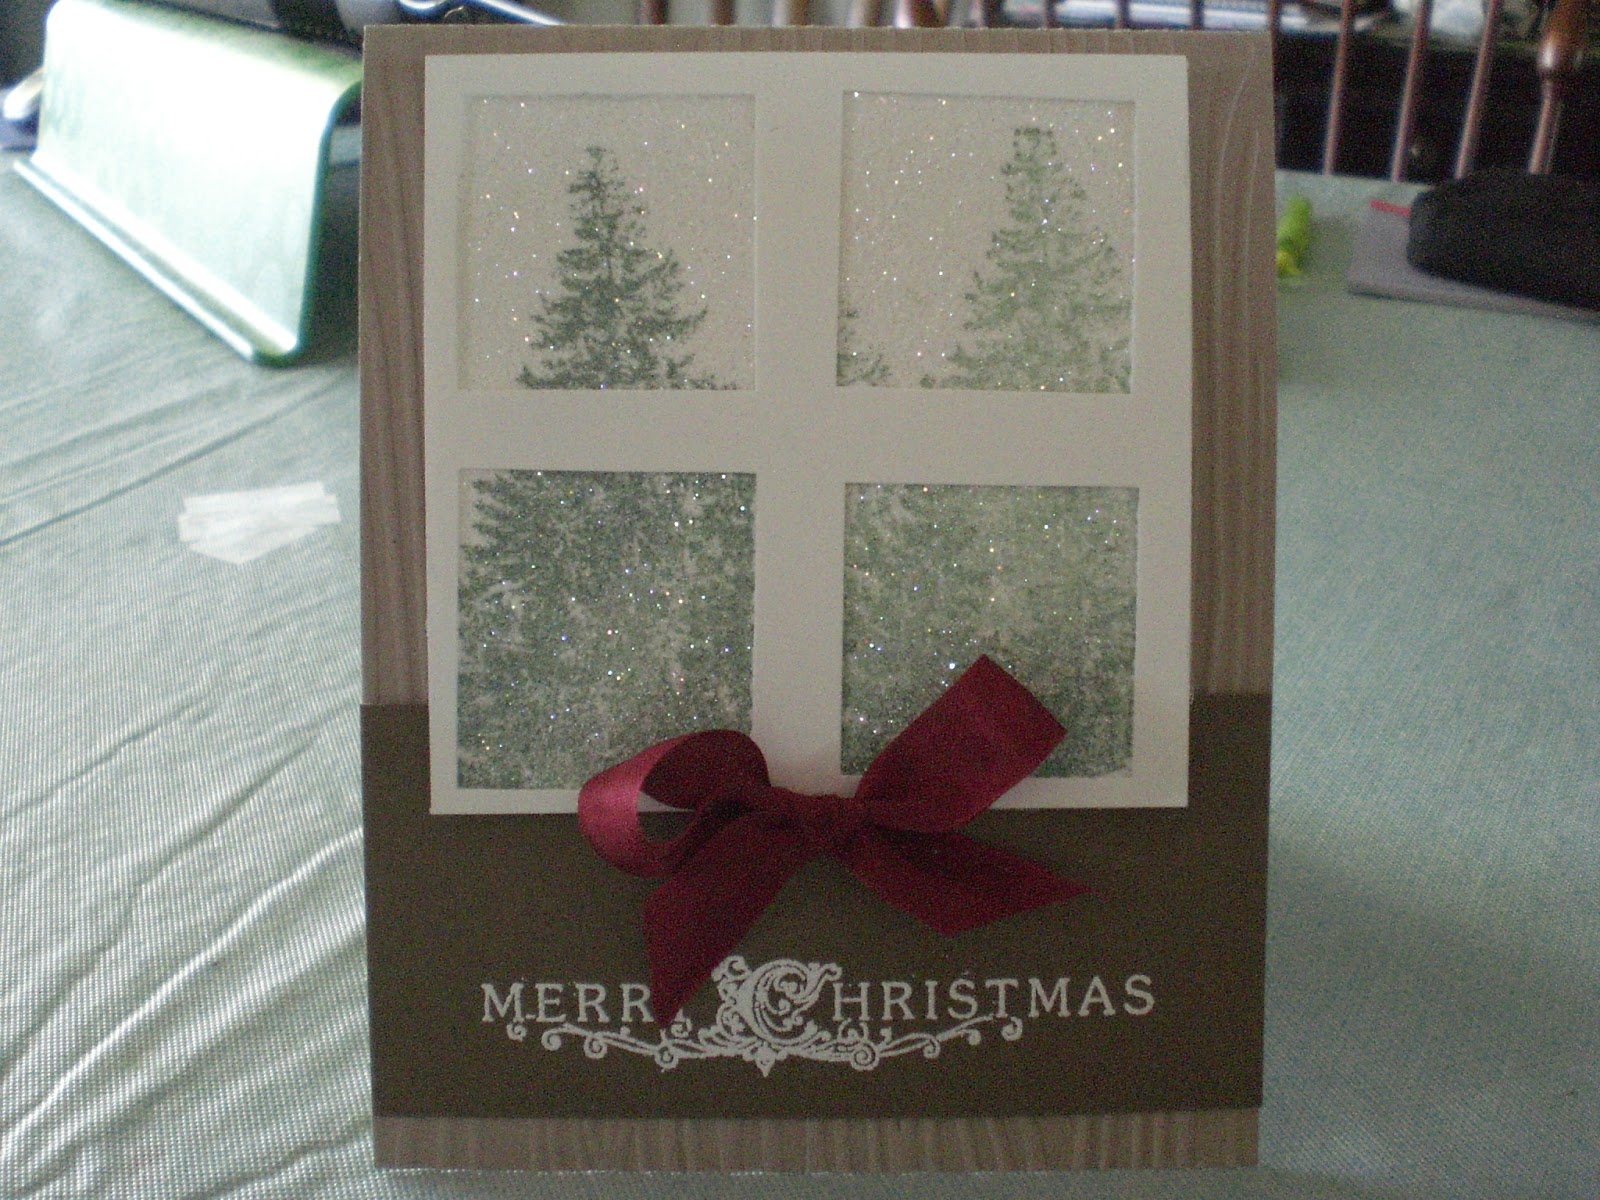
I am sharing 2 cards we made for stampers club this month.   This first card is one I made at Connie's Monthly Meeting, she is my 2nd upline and has a monthly meeting about 45 mins from my house...I try and made it each month.   I CASEd this and just changed the Greeting.   I borrowed the stamp set, Christmas Lodge cause, **GASP** I don't own it!! Can you believe it???  My friend, Joyce Clark loaned me the set so I could recreate it.   To make the glittery trees, you stamp your image on white card stock and then place an adhesive sheet cut to the same size, over it, first pulling off the the printed liner, then place exactly (or as close as possible) over your stamped image piece, press with your hand or bone folder, then peel the other layer off the adhesive sheet.   Now be careful, it is really sticky!!! then sprinkle Dazzling Diamonds over the whole image.   That's it, your done!   I ran the crumbcake card thru the Big Shot with the woodgrain embossing folder, Stamped Merry Christmas in versa mark ink and embossed with white embossing powder and heat set.   To make the window frame, it is a little tricky.   I made a template with some thin chipboard (actually a cereal box works well) and measured where to punch the windows with the 1 3/8" square punch.  Adhere the window pane with snail and then the whole panel with dimensionals to the card.   I tied a bow using the red seam binding and attach to card with a mini glue dot. 


This 2nd card is my winter birthday card.   I CASEd it from one I had seen on Stampers' Connection, just one of the benefits to being a Stampin' Up! Demonstrator....It's a HUGE resource for demonstrators ALL OVER THE WORLD!!!


The card is Baja Breeze, my favorite color!   I paired it with Early Espresso, card stock and ink.  I inked the image from Serene Silhouettes with Baja Breeze ink and removed the ink on the birds with a Q-tip and using my Early Espresso marker, I colored in the birds and touched some of the branches with the marker too.  Don't you just LOVE how Stampin' Up! color coordinates everything!!
 
I put the card layers together using snail and the stamped image and layer behind it, I popped up using Dimensionals....a staple in my Stamp room.   I panic if I only have one package in my stamp room.  I used black 3/8" taffeta ribbon and tied a knot around the panel with Subtles DSP  and stamped Happy Birthday in Early Espresso ink.  After the card was completely assembled, I coated the branches with Dazzling Details and it looks just like a tree covered in ice.
 
 
Here is a List of items I used on these cards:
 
 
Christmas card:
Crumbcake, Soft Suede and Whisper White cardstocks
Christmas Lodge, (clear mount)  #123769
Cherry Cobbler Seam binding #120992

Versa Mark Ink #102283
White Embossing powder #109132
Garden Green ink #126973
Heat tool #129053
Wood grain Embossing Folder  #127821
Big Shot #113439
Dazzling Diamonds glitter #102023
Multipurpose Adhesive Sheets #120805

Birthday Card:

Baja Breeze, Early Espresso and Whisper White cardstocks
Serene Silhouettes (clear mount) #127324
Sassy Salutations (cm) #126707
Baja Breeze ink#126960
Early Espresso Marker #119680
Early Espresso ink #126974
Subtles DSP #117152
Black taffeta ribbon #1119962
Dazzling Details #124117

ENJOY!

Money Holder

Tonight while looking thru emails and blogs and even  some templates and projects, I came across this money holder.....I think from Barb Mullikin.

I used Bashful Blue card stock for the holder, 6 1/2 x 9 1/2 and score at  3 1/8 and 6 1/2.  Fold on the score lines and cut the smallest panel on the diagonal, but not as low as I did (cause you can see the money at the bottom when it is closed, but just a bit.  I used some old retired DSP and punched out a snowflake and added it to the front using dimensionals.   I stamped the polka dot frame from the stamp set, Four Frames, using Old olive ink and then stamped Merry Christmas from the Teeny Tiny Wishes in Bashful Blue ink and punched out using the large oval punch, attaching it with snail and then putting the label on with dimensionals.  

 I put a dollar bill in my sample, but the recipient of this money card will get more than a $1 bill!!!
 
 
Happy Thanksgiving to Everyone...   I am so Thankful for my family...
 
ENJOY!
Have a Blessed Thanksgiving


Wednesday, November 21, 2012

Come to Bethlehem

Tonight I did some stampin'  some easy cards.   I used the stamp set that is on the Extravaganza Sale, Come to Bethlehem.   Basically the same card, different colors.

The first one is a crumb cake card and stamped the image on very vanilla card stock with Soft Suede Ink.  I have over a 100 ribbons, current, retired and some from the Ribbon Outlet in Hagerstown, Maryland..I ended up choosing the wide olive organdy ribbon that retired a few years ago.   I sponged the card and the stamped layer with crumb cake ink.  a real simple card that took only 5 mins to make. 

This second one was even simpler, Raspberry Ripple card, Whisper White layer, image stamped in Raspberry Ripple ink and Raspberry Ripple stitched ribbon....Notice, they all match, card stock, ink and ribbon.   I love how Stampin' Up! keeps is all coordinated.


ENJOY!  

Message at Church this week:   Second Chances.....Give someone a second chance.   You'll both feel better!

Monday, November 19, 2012

EXTRAVAGANZA SALE


BIG  EXTRAVAGANZA SALE!!!


Click here for the list of items.   Some items are on sale just for today!

Saturday, November 17, 2012


Email me to learn more about this sale.    You can see the items listed on my Stampin' Up! website, www.stampergirl.stampinup.net. (because I cannot figure out how to put a pdf on my blog.   I will be ordering during this promotion, putting my first order in on the 19th and the last on the 28th.   I will put orders together and draw names for Hostess $$$.   Some items are only on sale on the 19th.   20 % OFF the Diagnoal Score plate, the BIG SHOT and the BIG SHOT Doctors Tote BAG.    REMEMBER ON SALE FROM MIDNIGHT the 19th until 1150pm on the 19th.   Then on the last day of the Sale, the 28th   the items for 20% OFF are:  The Clear Block Bundle, The Clear Block Caddy and the Stack and Store Caddy. 

Sunday, November 11, 2012

Gift tags to go with the designer tags cards

Here are the Gift tags that we made with the designer tags leftover from the Christmas cards.


I stamped the same sentiments on the tags except 1 that I did on the cards...   I cut the tags out using the Big Shot and the Labels Embosslits.  OH SO SIMPLE!!! On the back of the tags, I stamped some images that go with the front of the tag, Like a reindeer on the reindeer tag,  and also stamped a TO: and FROM:  I will use these on a larger gift this Christmas. 

These are some really cute cards to give anyone, and you could even inclose a gift card in them for a last minute "gift" for that special someone.  In a couple of hours you can make these cards yourself.   AND the gift tags TOO.

Contact me to order your designer tags and note cards and envelopes to make these tags and the cards too.


Saturday, November 10, 2012

Christmas Card Stamping Day!!!!

Today I had a house full of stampers, all kinds, new stampers as well as stampers who have stamped for years.   We made a whole bunch of cards and I even finished my cards on the inside and stamped the envelopes.   I have 20 cards, complete, ready to write inside and address the envelopes!!!

The only thing I did not do today, was TAKE ANY PICTURES!!!!!  What was I thinking?   I guess I wasn't thinking, that was the problem. 

There were 10 ladies here all together, 3 of the ladies were new to stampin' and they made the tag cards.   In the Holiday Mini catalog - (Did I say Mini, well it is chock full of stuff, no real mini)
On page 12 there are some printed designer tags, 25 altogether for just $3.95.   I paired those tags with the note cards and envelopes that are in the main catalog, pg 160 right in the middle are the note cards and envelopes, just $5.95 for 20 cards AND envelopes.   These are a bit smaller than the regular handmade card, but costs the same to mail them.   Add some color card stock and emboss it using the big shot, layer onto the card and add the tag with a bit of stamping and some added bling using dazzling details, white gel pen, crystal effects and of course the very popular - dimensionals.

Here is a picture of the cards.


I embossed all the color cardstocks on the cards and used dimensionals on most of them.  

ENJOY!

Monday, November 5, 2012

Petite Purse Big Shot Die

I am making some favors for my church's Womens Retreat.   I used the petite purse BS die and some retired colored card stock, Pink Passion and Only Orange.

Here is a picture of the purse, it is filled with a special chocolate treat.   The front flower was made with the Boho Blossoms punch and the Itty bitty punch pack punches and a rhinestone in the middle.


55 Complete, 25 cut out (that is EASY), sticky strip applied to the sides, flowers all put together waiting to be glued on the front of the purses.    Will finish tomorrow! This is the 55 completed purses in a box!

Here are my helpers.   My daughter, Aimee and granson Jacob came to visit and I put them to work.   They punched out all the flowers, layered and glued them together.  Jacob liked filling them with the chocolates.

BLOG POSTS

Everytime I try and set a scheduled blog post, it never works.   I find out days later, ok almost 2 wks later that the last post didn't get sent out!!!   I will have to send some feedback to blogger and find out why this keeps happening.   It started after their last update.

Club Cards and my Mom's version

This months Club cards are kinda bak to the basics....what I love... STAMPING!

I did use my big shot because it is simple to cute shapes out, but you could cut any shape out to do the job.  

Both of the cards I found thru Stampin' Connection, it is a great resource for Stampin' Up! Demonstrators.   Has a wealth of information, techniques, videos, and so much more, just one of the perks of being a demo.


This first card is a masculine card and when opened there is a place to put a gift card of money!  All stamping using the stamp set, The Open Sea  I used colors Not quite navy, cajun craze and very vanilla cardstock.   I did cut the ship out by hand and it wasn't hard, but I wouldn't want to have to cut a large amount of these out.   The cajun craze shape is from the Window frames collection framelits dies and the inside greeting I cut out the same size in very vanilla.  I used the Early Espresso bakers twine.  

This next card seems to be all the rage right now.   Convention, I receveived 4 swaps that were done using this technique so I thought I would share with my club members.  


My Mom is in my stampers club, but lives a few hundred miles away, and she didn't have the stamp set I used, so she substitued some stamps she did have.   I think it turned out pretty good, don't you? 

Wednesday, October 17, 2012

Thank You card, Double Embossing

I was checking out some videos on the Stampin' Connection site for demonstrators and found one on using two embossing folders.    I tried it and really liked how it looks and it was really easy.   I didn't have the stamp she used, but copied everything else exactly. 

Here's my version:


I used one of the butterflies from Papillon Potpourri and inked the stamp in Summer Starfruit and then took a dauber and sponged Midnight Muse and stamped it on a vanilla rectangle....Guess what happened?   The color on the edges was green not blue like it should have been, so I figured I didn't have enough ink on my sponge dauber, so I cleaned my stamp and did it again.   This time it turned out blue, but if you look close you can see some green in there.   I waited a minute til the ink dried and then used my 2 way glue pen and dazzling diamonds to give it some dazzle....

Here is how to do the double embossing.   First put your card stock in the large embossing folder ( put it in sideways so that there is the small area that doesn't emboss for the greeting).   Next take the rectangle embossing folder and place your embossed card stock where you want it.  No on top of the rectangle embossing folder you will want to have a shim a thick one (I made mine out of a thick piece of chipboard).  This is how you put it thru the Big Shot:   Multi platform plate with tab 1 and 2, then your embossing folder with the card stock in it and then top cut plate (no bottom cut plate needed).

To assemble, stamp your image on the size of the opening of the rectangle (if that is the embossing folder you use), then adhere to the embossed card stock and assemble the card as usual.

Hope you try it, it really is a nice look.

The New Stampin' Up! Trimmer is almost here!

Stampin' Up! has a video on the demonstrator website on the use of the new paper trimmer, it is available for demonstrators to order, SO of course I had to order it!!!  Now I can't wait for it to come.  It will be available sometime in November and I will send out a notice when it does.   I hope to have it in time for my Nov 3rd Christmas card stamp a stack, I will demo and let everyone try it out.  

Friday, October 12, 2012

Little Thank Yous

A few years ago,  OK  11 yrs ago, I purchased a small box with 2 stamps, a ink spot and small tags, 24 of them.  This little box has sat unopened, unused in a stamp drawer with an assortment of stamps,  I never really noticed it until last week, I opened the drawer to get a birthday stamp out, had to move some things around to find the one I wanted to use, and picked up this little box....Oh my, how many times have I picked up this box???? an still never noticed the contents.   I emptied the contents on my desk and thought, hm mm. what can I do with these tags?  I decided to stamp two of the butterflies from the set Kindness Matters, pg 74 and a Thanks also from this set and I used a Thank You from a set from long ago says 2000 on the wood stamp.  I made 10 of these little cards and I carry them in my pants pocket or my wallet and have been leaving them on counters, the drive thru bank drawer.   Just a little thank you to those people that work hard and to let them know someone appreciates their work. 

Here is a picture of the front and the inside - they are 1" x 2" folded in half.  I don't sign them, they don't have a stamped name on the back or anything. 

 
I have left these at the Winfield Branch of the PNC Bank, the drive thru drawer, these tellers and all the staff at this branch are the BEST!!!  They are friendly, look at you, speak to you, call you by name and hare so helpful.  If I have a deposit or want to cash a check, I will pass other branches of PNC, just to go to this branch.   Today when I went into the bank to cash in my "loose change" and one of the ladies, Vicky said to me, We have a mystery...have you left little thank you cards in the drive thru window....I said yes, mystery solved....
 
So, if you have some small stamps sitting around and some scrap card stock, stamp a few of these and give them out to people = kind of like a smile.
 
ENJOY!

Sunday, October 7, 2012

Rachel

I am trying to upload pictures from my iPad to the blog, so I will try a picture of Rachel, my granddaughter.

She is growing up so fast.


- Posted using BlogPress from my iPad

Saturday, October 6, 2012

September Stampers Club Cards

The first card, uses the Elements of Style, I completely copied this from ???? I don't remember!   I have looked and looked to find it again, but sadly I have spent way too much time, over an hr searching and could not find it.   SO, if this is your creation that I copied, let me know and I will update my post.   Thanks for the inspiration.


I wanted a card that was simple, no Big Shot...It was hard not to use it since it is always sitting on my work table, but I stayed strong!  I used the scallop trim border and corner punches and the rest was stamping on primrose petals card stock and regal rose card stock.   The hummingbird and swirl were stamped with primrose petals ink and the ink stays wet longer to be able to embossed and I used clear embossing powder.   I added some dazzling details, but didn't wait long enough to put the layer on top, so smeared it all over the top layer, but didn't make a difference.    The regal rose layer is stamped with regal rose ink and the flower branch stamped randomly cover the whole card.  I stamped the greeting in primrose petals ink and embossed that too.  Pop the humming bird image on dimensionals and your done, took about 5 mins to make this card.   Super Quick.

The next card I copied too, and can't locate the original post so that I can give credit, so if it is yours, let me know and I will update this post.

A Christmas Card, made with the hew Ornament Keepsakes stamp set and framelits dies from the Holiday Mini Catalog.  I stamped the ornament in Real Red 3 times and folded each one in the center and then attached them together with tombo adhesive.  I used the Candelight Christmas DSP for the layer along with real red cardstock.   After I made this card, I tried it again with the snowburst embossing folder using the big shot and I liked that one better.  Stamp the greeting from Teeny Tiny wishes in real red on white cardstock and punch out using the modern label punch.  I added some gumball green ribbon since it was on sale last monthand glued the ornament right on top using the tobow glue.   This card did not take lone, just cutting out 3 ornaments took the longest. 

If you have any questions or want more information on how to make these cards, don't hesitate to contact me.


Friday, October 5, 2012

Stampin' Up! Promotions for a Limited Time, October and Forever

First I want to say, I am so sorry for not posting in what seems like forever!   I have just been way too busy.   The past couple of weeks the Message at my Church has been SIMPLIFY!   Well, that is what I am trying to do.

I have sold some Stampin' Up! retired merchandise that I needed to stop holding onto, and the money will go into my "jar" to help pay for my attendance at the Stampin' Up! Convention next July.   I have gone around my house and gotten a whole truckload of items to sell at a Flea Market and I donated a ton (almost true weight!!!) of stamps and craft items I no longer used and that I really just wanted gone!!!   It feels good to have those things gone and now I have some FREE SPACE in my house and craft room (although you can't tell by looking at it yet). 

Stampin' Up! has some great promotions going on right now:   Check them out!

 
This offer is only available thru October 31st.


The single stamps listed below are for a limited time only..... thru January 2, 2013.

Some sets are being offered as single stamps. This is a pilot program, to see if our customers would like to order stamps this way, so if you like this idea, consider buying at least one. Here are the details:  

These stamps are available on any order, even an online order. 
  • You can find the stamp item numbers on the flyers.
  • The single stamps can be ordered in the online store.
  • These won't be sent to you in our typical cases or packaging; they'll be packaged in cello bags. If you'd like a case for your stamp, you can buy our Clear-Mount Stamp Cases that come in packs of four (item 119105).
  • This offer is available for clear-mount stamps only.
  • The stamps won't come with a Clear-Mount Block, and you'll need to buy a block separately if you don't already have one. The recommended block sizes can be found on the flyers.
  • There's no limit on how many pieces you can buy.
  • This offer is not available in Quebec.
 
WordPlay


Other stamp sets available for single stamps are Perfectly Penned and Seasonal Sayings.

Contact me for more information.Thanks


And this next promotion is FOREVER.... My Digital Studio, MDS printing prices have been reduced FOREVER! yep, Forever.  Go to  My Digitial Studio to see the prices and just check out what MDS is all about!

Saturday, September 15, 2012

Rachel visiting Storyville at Rosedale Library

I am still in the learning process of posting using my iPad,   I couldn't figure out how to edit my last post, so I just posted it instead.


My friend Karen sent me this picture of Rachel and I at the Rosedale library, Storyville.   It was our first time there, we met Cameron, his mommy and Nana (my friend Karen).   There were other babies there too and they were all born within 10 days of each other.      We had so much fun, probably as much as the babies did.   Still in Florida and will hopefully get some more stsmpin' done before I am back home.


Enjoy!


Christmas Stamp a Stack in Florida

I am down in Florida For my brother's wedding today.    Yesterday, I held a Christmas  card stamp a stack with Adela, Blanca, Cynthia, Joyce (my sister) and my Mom (Edna).

Here is my Mom making some of her cards.


We had a great place to spread out and stamp away...the clubhouse by their pool, I had a table for each card and two cards that used blender pens and aqua painters I put together.


Here is a picture of everyone


Blanca, Adela, my Mom, Cynthia and Joyce.... Making their cards.   Blanca - can you send the picture I took with your camera to my email?   Sbjcarol@yahoo.com..

As soon as I get back home,  I will plan dates for some stamp a stacks at home.   I will be holding 3 different stamp a stacks... A mini stamp a stack - a regular stamp a stack and a quick and easy one.


Saturday, August 18, 2012

Club Cards for August Club

Summer is coming to an end :(, I love the Heat!   I know, I hear the groans, about the heat, humidity, hazy weather, but I LOVE IT!!!    and I love these cooler nights and the warmth of the sun on these days, but dread the cold that comes with winter.

The last 2 months have flown by.   July was Stampin' Up!'s Convention which was phenomenal!!!  Lots of FREE stamp sets, and accessories, swapping, sharing and learning, meeting new friends, and seeing friends from Conventions past.   I came home, unpacked and got ready for my annual family picnic.   Mom and Ed and my brother and his fiance came up from Florida to see everyone and we had a great time.  YUM!   Steamed Crabs!, Family, Good Food.   What could be better?


There were my birthday and my daughter, Robyn's birthday and we decided to go to Ocean City for a two day mini vacation for our Birthdays.   Came home and packed up for our annual trip to Knoxville, Iowa for the Knoxville Nationals Sprint Car Racing.   While out in Iowa, I met up with fellow demonstrator - it's a network folks!!!  everywhere I go, I look up demonstrators in the area to meet and share.  I met up with Becky Watkins and we shared some of our projects from classes, conventions, group meetings, etc.   My husband and I left Knoxville and headed to NC, to the Cherokee Casino area and met up with his sister and parents, it was a fun time (not a rich time, but fun anyway!)  Now back home a few days.   Got ready for my Stamp Club that met last night and again tomorrow to make their cards.   This round of my stamp club is ending this month, but the new one starts up in September and I do have a space available....Contact me for more information, but do it soon!

This first card uses one of the new sets in the Holiday Catalog, it is also a part of a bundle.   If you purchase both the stamp set and the framelits that coordinate with that set, you save 15%!!!, there are several different sets to choose from. 

The set is Scentsational Season and I used the mug and aroma swirl and the matching framelit that cut out the mug so nice and evenly.  I also used the label framelit behind the mug and popped up the mug using our wonderful dimensionals.   I used the new Core'dinations card stock in Cherry Cobbler, embossed with the Lacy Brocade embossing folder and sanded the card stock to show off the white core of the card stock (I don't have the new sanding block yet) so the sanded part is not as white as it can be, but I like it.  I placed this onto a Crumb cake card and tied some crumb cake seam binding in a knot and tied the tag made with the modern label punch and the greeting from Petite Pairs stamp set with linen thread.

I inked the mug in Always Artichoke ink and put some peppermint embossing powder on top and heat set it.    

AND my club members have at least one Christmas card made now!!!  WOO HOO!


The next card was made with the Moving Forward stamp set, the Ronald McDonald House stamp set this year.....Stampin' Up! donates $3 from the sale of this set sold to Ronald McDonald House Charities.   Only one way a they have partnered with Ronald McDonald House Charities, they make a generous donation once a year, they donate the $3 from the sale of each of these sets sold and they have demonstrators across the country go to local houses and volunteer time at the house doing whatever is needed.   I volunteer here at the Baltimore RMcDH every month stamping the the guests who are there and love it!!!


The card is Lucky Limeade (anyone shocked I chose that color???) I layered a piece of Lucky Limeade DSP and added a piece of Daffodil Delight ribbon.   The melon mambo layer is embossed with the Chevron embossing folder and put on top of the card using dimensionals.   The bike from the stamp set is inked in melon mambo ink and I used daffodil delight and lucky limeade markers to color on the stamp for the flowers in the basket.   I stamped Happy birthday in Pacific Point.   To add some bling, I added rhinestones on each wheel.


ENJOY!


FREE SHIPPING !!! Plus DSP Sale still going on

 Hey, I know it’s been like a hot minute since last posting on my Blog, but here goes!   I have a few wonderful products in this new catalog...